RAW Tests, November 2021
Posted 2021-12-31, updated 2022-01-01
Introduction
I tested two “camera agnostic” RAW formats, Blackmagic RAW and Apple ProRes RAW, to see how they compared. Both RAW formats are available using offboard monitor/recorders with a variety of cameras (hence “camera agnostic”), and often the same camera will support both formats equally well. By using the same camera for both RAW recordings we can clearly separate the characteristics of the different RAW recordings from the characteristics of the camera’s image.
I used a Panasonic Lumix DC-S1H as the source feed. The S1H is a full-frame mirrorless stills/video camera capable of sending a raw feed over HDMI. ProRes RAW was recorded using an Atomos Ninja V while BRAW (Blackmagic RAW) was captured with a Blackmagic Design Video Assist 7” 12G HDR.
I opened the clips in their “native” NLEs: BRAW in DaVinci Resolve 17.4 and ProRes RAW in Final Cut Pro 10.6. As Resolve does not decode ProRes RAW and FCPX can't read BRAW, I also compared a few samples in Avid Media Composer, which can open both RAW formats. The Avid test confirmed that the differences I saw were due to the formats themselves and their demosaicing, and not due to the post-demosaic processing of different NLEs.
Results
Both RAW formats provided the normal benefits of RAW recording, allowing a wider range of exposure and color adjustments in post than log- or gamma-encoded captures. Both offered the same headroom and the same flexibility when pushed to extremes. Both formats in their high-quality modes capture images free from visible compression artifacts. (While ProRes only offers RAW and RAW HQ levels, BRAW allows a wide range of quality level and compression ratio options, trading off storage space and recording bandwidth against image quality.)
However they did not render images identically. In general, BRAW has a slightly crisper image compared to ProRes RAW, while ProRes RAW has somewhat finer-grained chroma noise than BRAW does.
I also saw differences in color rendering between the two formats, though these differences were in the overall shape of the vectorscope pattern, not idiosyncratic handling of individual colors. Much of that may be due to the different vendors’ interpretations of Panasonic’s color rendering and different pathways the data takes from each RAW format to the screen; I discuss that in some detail later.
It's important to note that neither format stands alone; each requires a decoding/demosaicing step provided by vendor software: a module or plugin capable of interpreting the RAW data. The images produced are the result of the raw recording plus its decoder, and different decoders can render the same RAW image with different apparent sharpness, different noise levels, and different color. When I asked Blackmagic about the differences in the two decoded images, they said:
...various filters, etc. are used during a demosaic process since you are interpolating pixels/information, and depending on your approach/algorithm, etc., this can all have an effect on noise and edge reconstruction, etc. If you optimize too much for things like charts with text and fine lines with strong edge contrast, typically “natural scenes” might be perceived to suffer (depending on preferences) and vice versa. Various compromises can be made, but in general, we put more focus into optimizing for natural scenes versus printed material like charts. That is just to say, while we still want “good performance” on any material, charts may not provide all insights into the strengths of one approach over another, or even what may or may not be happening “under the hood.”
Bear that in mind as you look at the pictures, and compare the natural scenes as well as the charts!
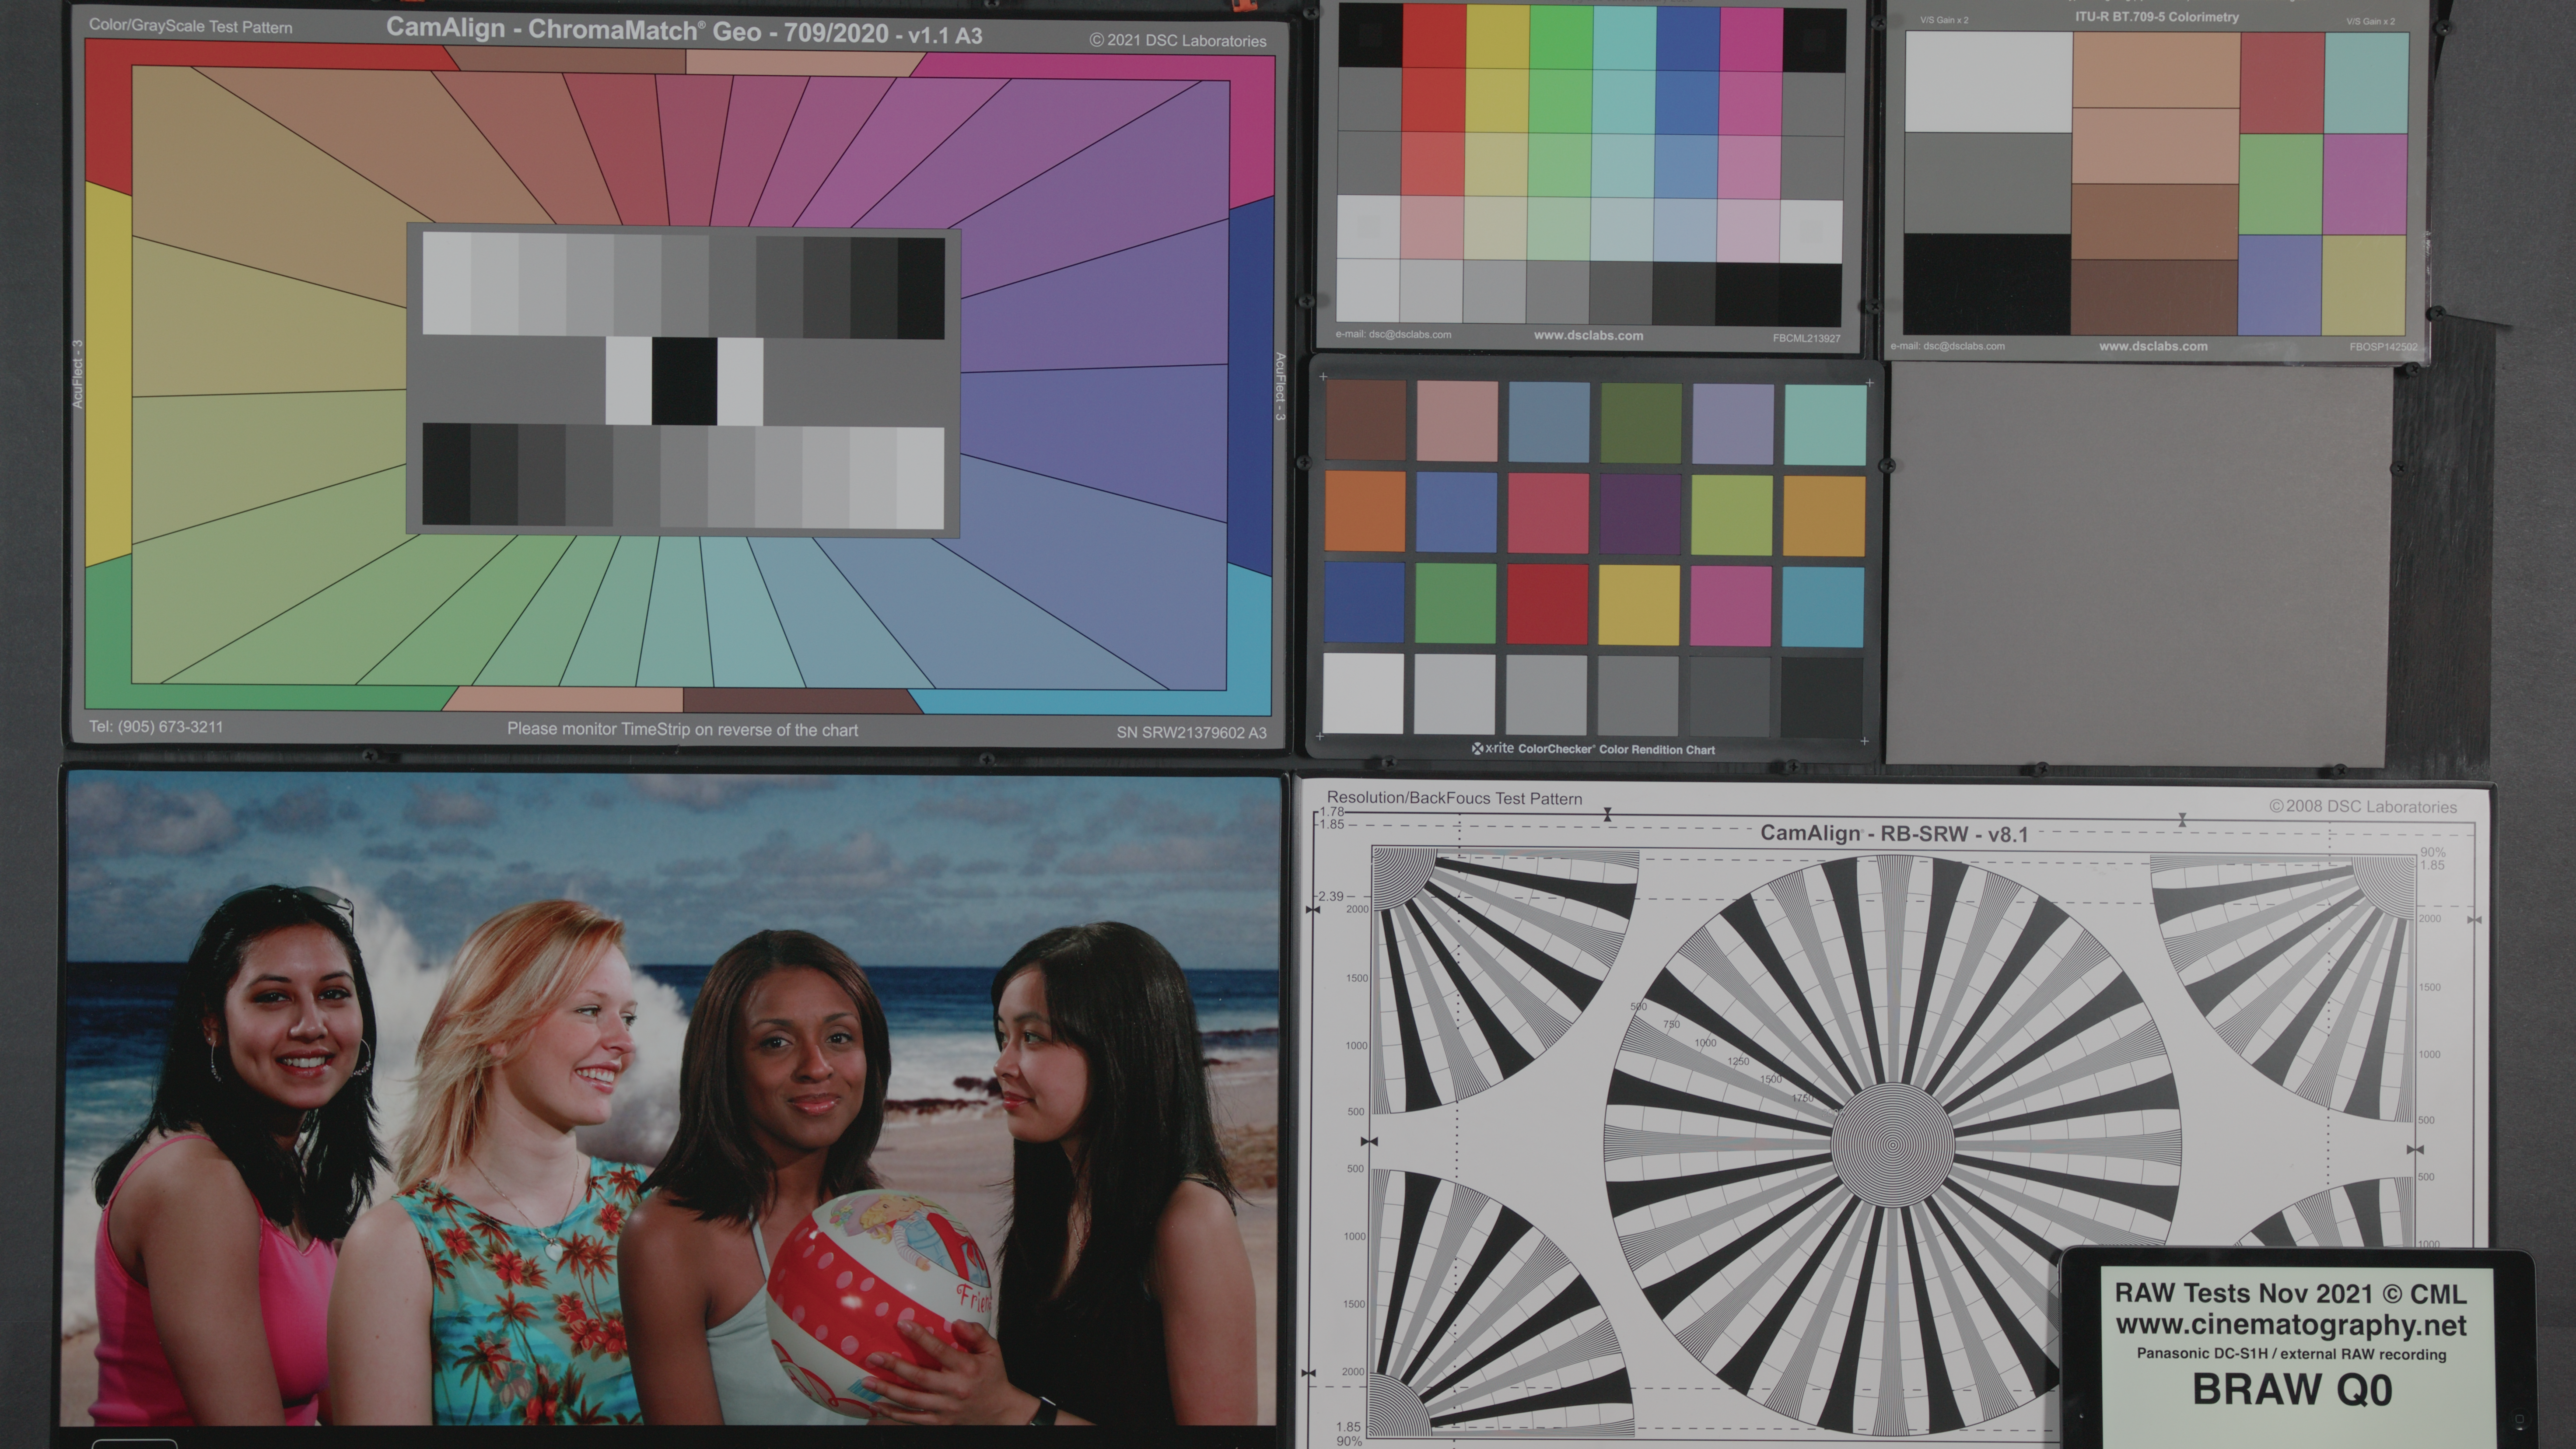
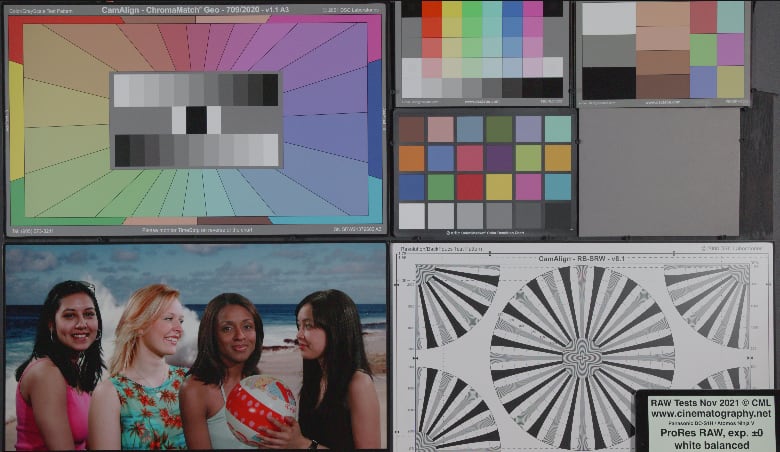
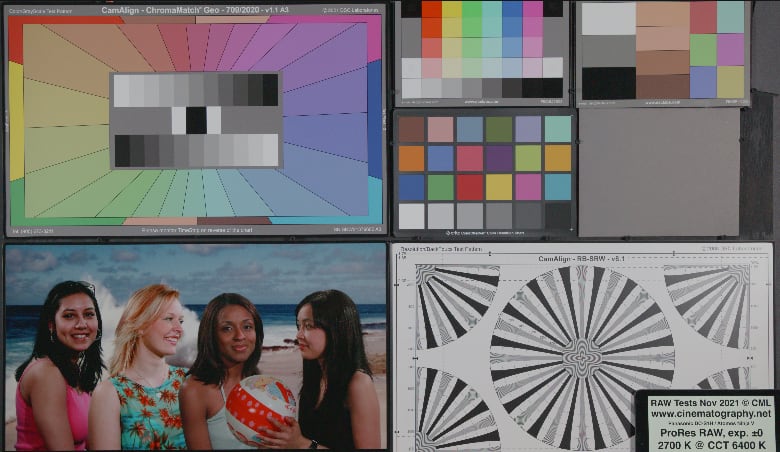
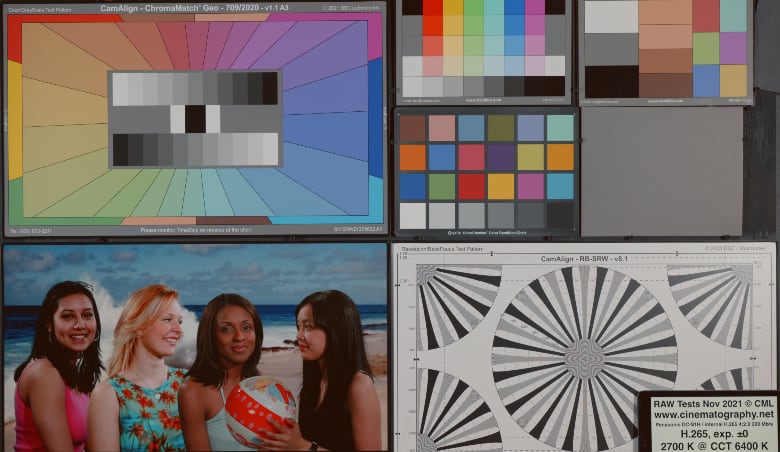
Chart tests: basic rendering, exposure and color recovery

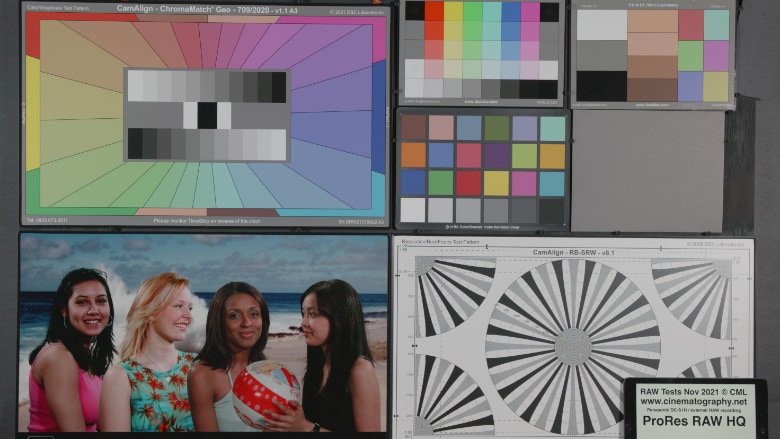
BRAW and ProRes RAW yield similar but not identical images. Downloadable samples below.
Charts were shot from normal exposure to +6 stops, both with the camera white-balanced on the gray card (which the camera’s metadata says was 8100 K, though two color meters said was more like 6400 K) and with the camera set to 2700 K and color corrected in post using the controls in the RAW decoder.
Images in these and other tests were decoded using the recommended gamma and color space settings to yield a V-Log/V-Gamut picture, with Panasonic’s V-Log to V-709 LUT applied afterwards, so the contrast and saturation are lower than you might otherwise expect — but at least nothing gets clipped!
In the exposure ramp tests, exposure was corrected in 1-stop increments using the ISO and/or exposure tweaks in the raw decoder, with minor fine-tuning in the NLE’s basic color corrector to match levels precisely. Color was left alone in the white-balanced ramps, and adjusted using the color temperature slider in the raw decoder to recover neutral grays.
While the charts were shot full-frame, 5888 x 3312, this video is a UHD H.264 rendering, so don't pixel-peep or download the video to see fine detail.
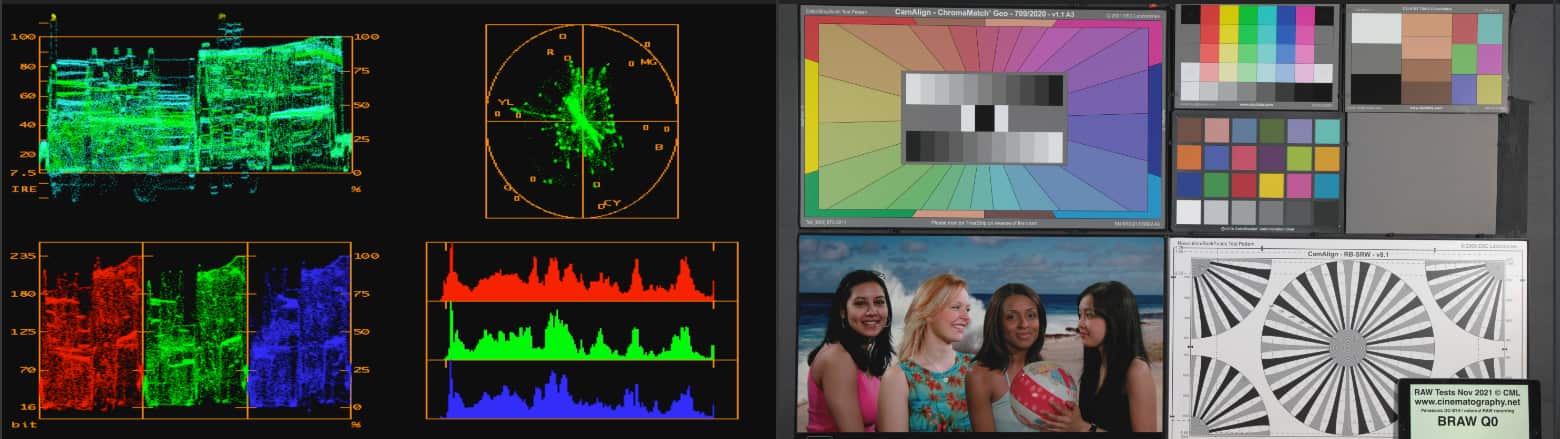
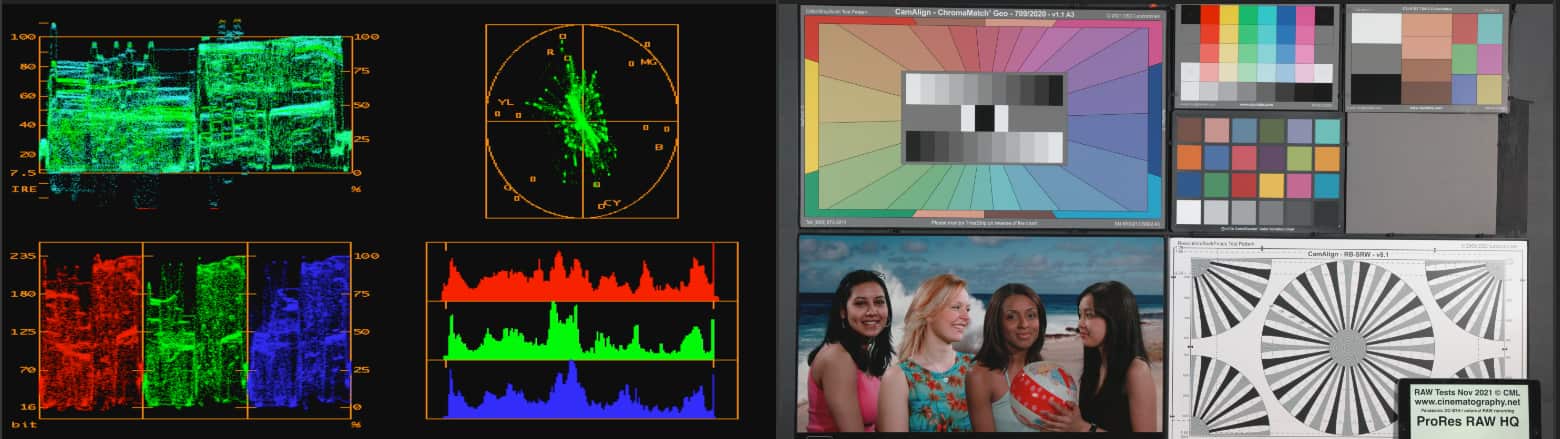
For pixel-peepers, here's a 1:1 crop from each RAW format, showing the differences in rendering and noise:
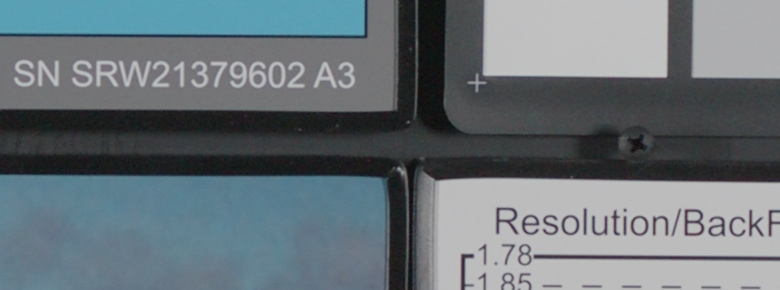
Blackmagic RAW
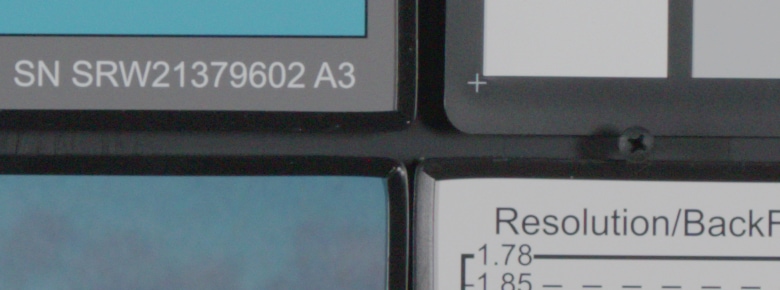
ProRes RAW
For more fun, here are samples transcoded into easily-openable formats that preserve the important details; download and pixel-peep as you see fit:
BRAW: PNG frame, 92 MB; OpenEXR frame, 62 MB; 10 frame ProRes 4444 MOV, 123 MB
ProRes RAW: PNG frame, 98 MB; OpenEXR frame, 70 MB; 10 frame ProRes 4444 MOV, 135 MB
Compression Levels: image quality and motion rendering
ProRes RAW comes in two flavors: RAW, which is very good indeed, and RAW HQ, which is even better and consumes about 50% more space. BRAW offers a wider range of choices. With the Video Assist recorders, you can choose variable bitrate, preset quality levels Q0–Q5; or fixed compression ratios from 3:1 to 12:1.
In the following video, the original clips are 4126 x 2176, and have the following bitrates:
| Codec | MB/sec |
|---|---|
| BRAW Q0 | 151.5 |
| BRAW Q1 | 128.9 |
| BRAW Q3 | 87.6 |
| BRAW Q5 | 43.3 |
| BRAW 3:1 | 109.1 |
| BRAW 5:1 | 65.2 |
| BRAW 8:1 | 41.0 |
| BRAW 12:1 | 27.1 |
| ProRes RAW | 109.6 |
| ProRes RAW HQ | 158.4 |
To clearly see the differences, download the original ProRes 422 version (this and the following videos are ProRes 422, which I found gave the best balance between preserving critical details and being reasonable to download). It's a UHD center-cut from the "Super35mm" 17:9 crop mode RAW out from the S1H, so there's no resizing, resampling, or interpolation, just straight rendering from RAW data to displayed pixels.
Cropping the image for a 1:1 output
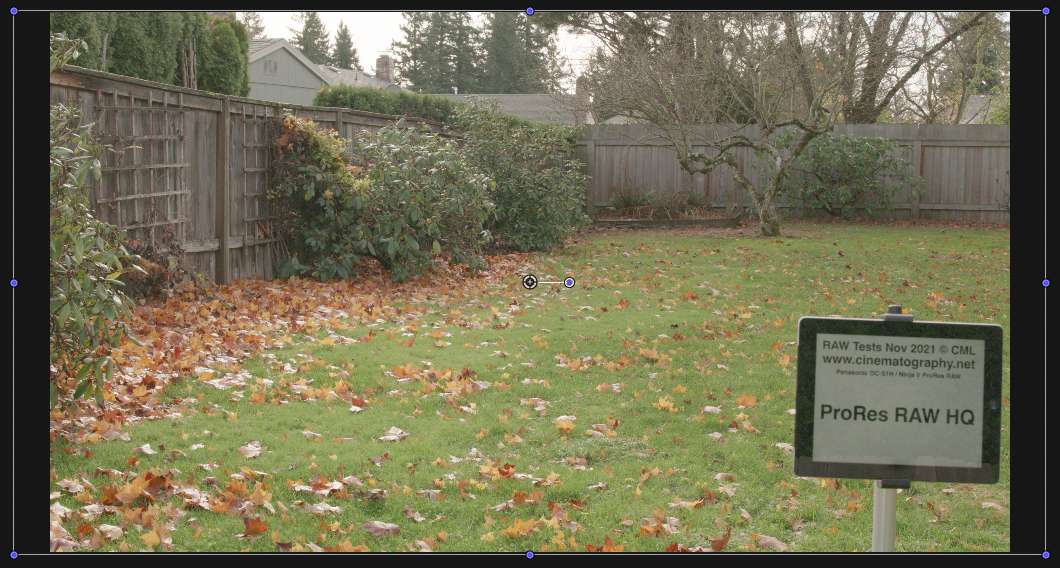
Sample Scenes
Four shots for comparison. Aside from the first, they're lockdowns, and shot in parallel: after recording on one recorder, the cable was swapped to the other without touching the camera or its settings. You can download both originals and play them in parallel for A/B viewing, or open two Vimeo players side-by-side, albeit with added web compression to obscure the differences.
Yes, the last shot is soft on the left; that lens needs some looking into!
More Info
Editing and Color
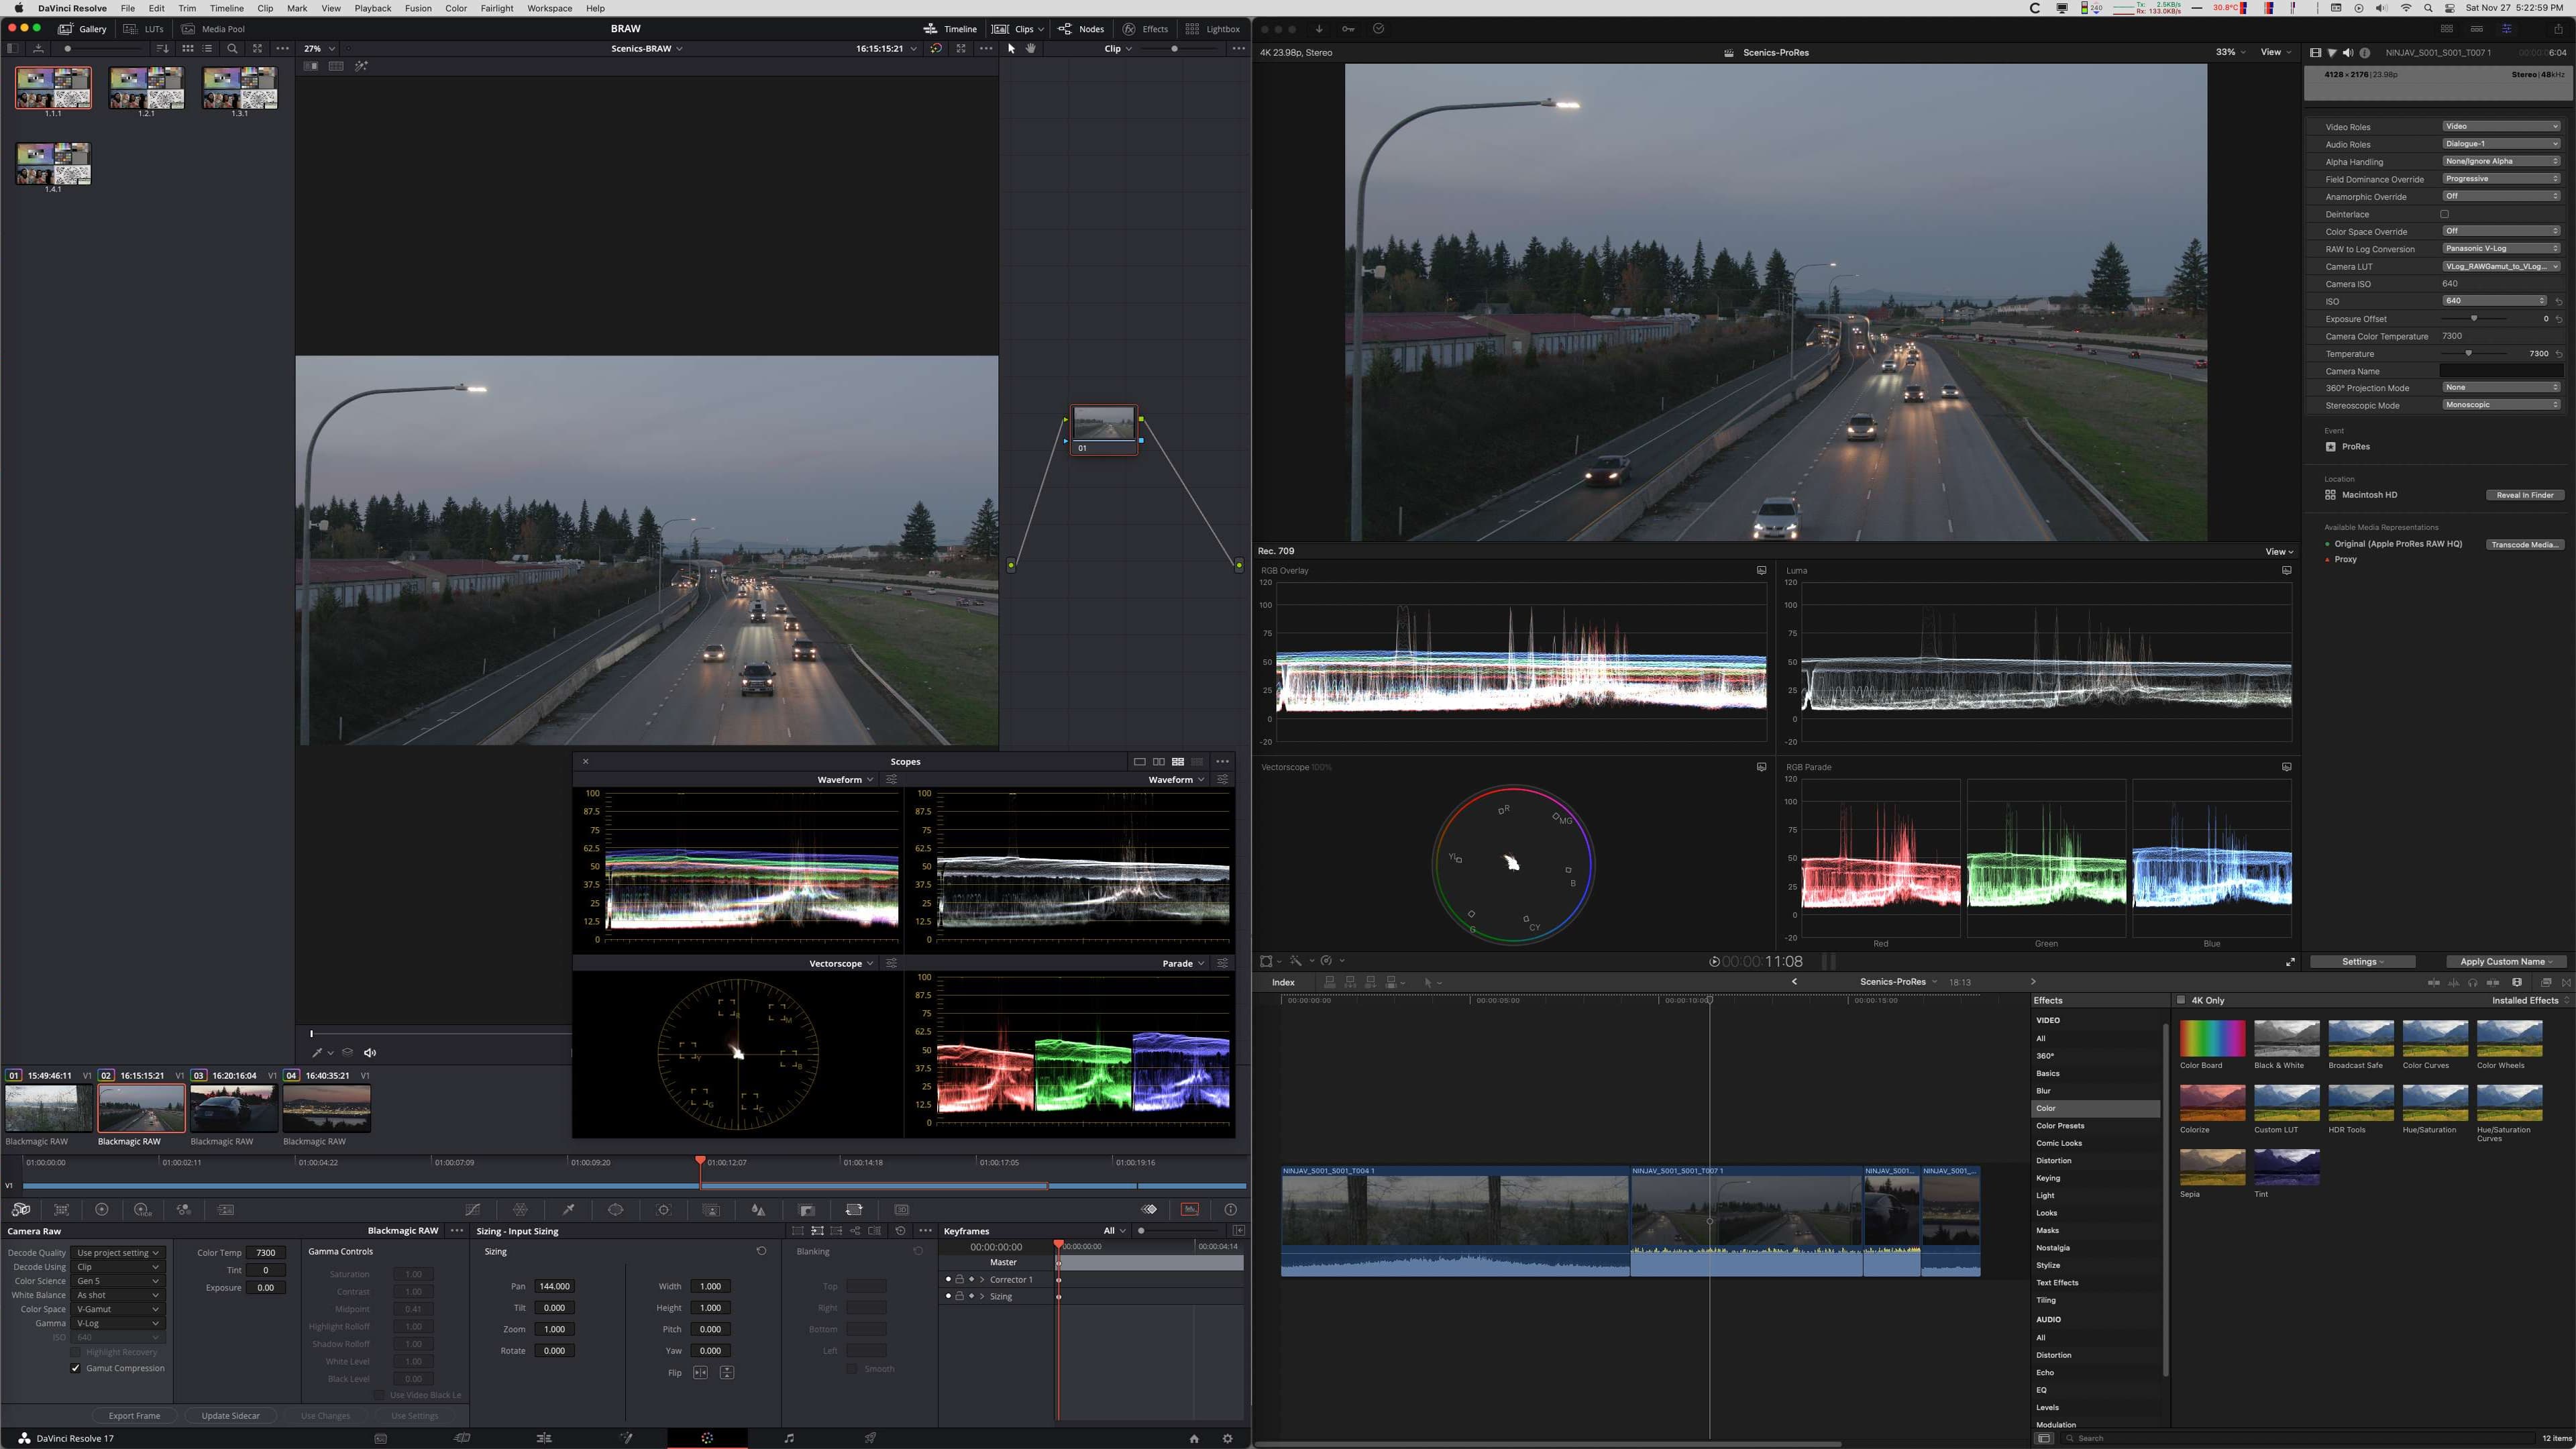
I processed BRAW in Resolve and ProRes RAW in FCP as I expected that each vendor’s native NLE could be expected to handle its own format properly, and as I was not doing anything to the picture beyond “developing” it from its RAW file the different capabilities of the two NLEs were not important. It did make for an interesting screen layout, though:
Each RAW format has its own set of decoding controls. For ProRes RAW in FCP they're in the clip info settings:

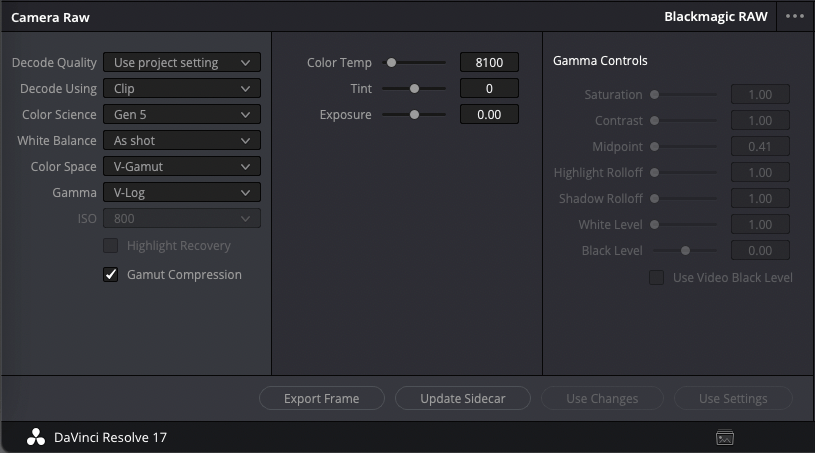
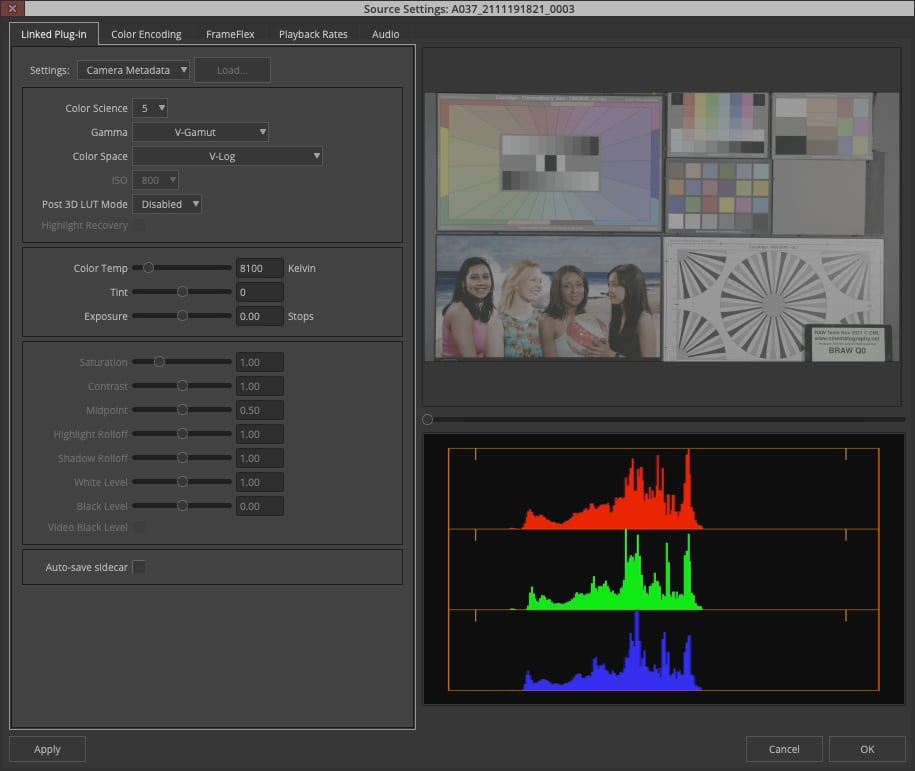
For BRAW in Resolve, they’re in the Camera Raw panel on the Color page:
ProRes RAW allows changing the clip’s ISO setting with the S1H, while BRAW does not; however changing BRAW's Exposure slider by a stop does the same thing as changing ISO by a stop.
Neither format allows extended highlight recovery with S1H data, as the decoder needs more intimate knowledge of sensor clipping levels than is available in S1H RAW data. BRAW from URSA Mini Pro 12K internal recordings has that information and highlight recovery is enabled for that camera; this is a limitation of what’s being sent over the S1H’s HDMI RAW link, and not a fundamental limitation of the format or its decoding.
Interestingly, ProRes RAW decoding doesn't offer a control for color Tint, only color Temperature, and the UI has no option for highlight recovery, disabled or otherwise.
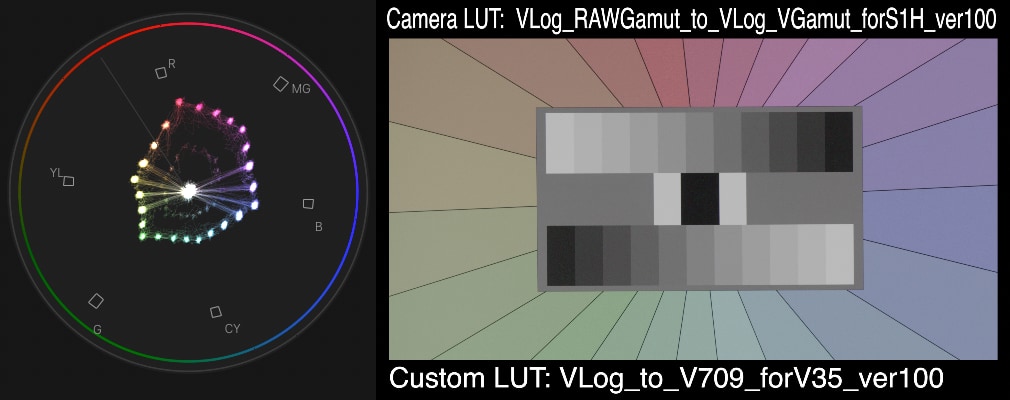
With the S1H, Panasonic recommends using a specific LUT for ProRes RAW decoding, but not for BRAW decoding, so I followed that recommendation.
If I simply accepted the default FCP setup — using FCP’s Panasonic V-Log LUT — here’s the color chart rendering I obtained:
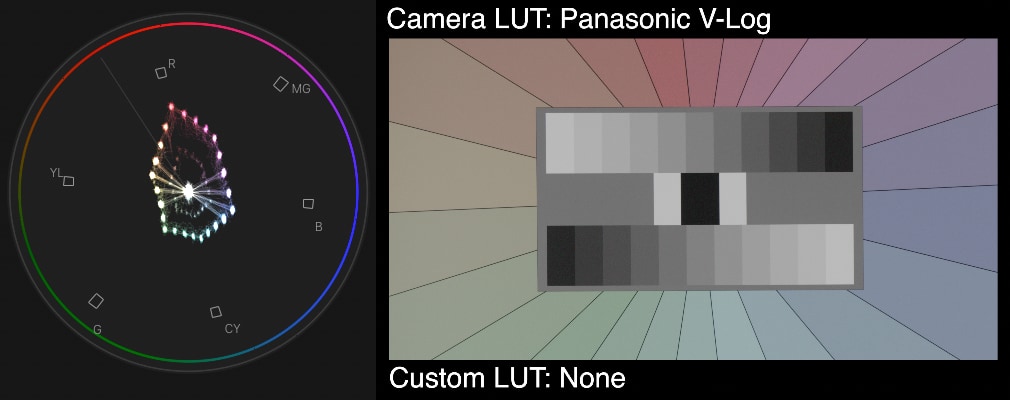
Using the recommended pair of LUTs gave me this:
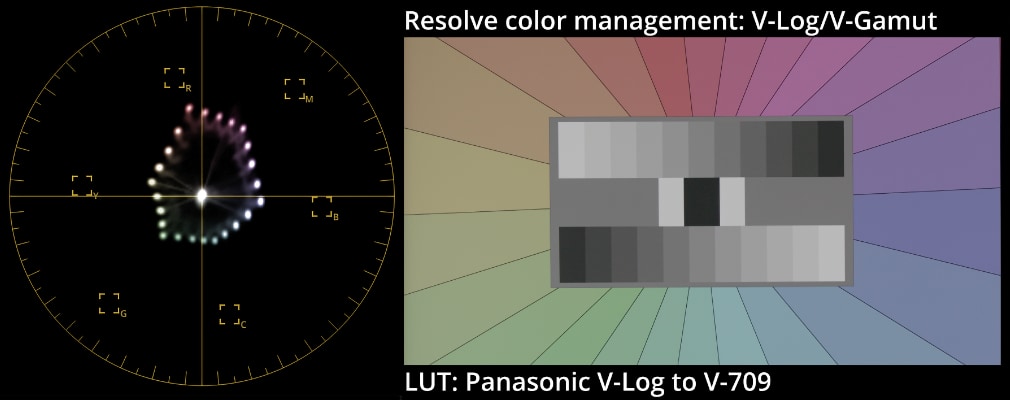
Using Resolve, the closest match came from a Resolve Color Managed workflow using the default V-Log/V-Gamut decode plus the V-Log to V-709 display LUT:
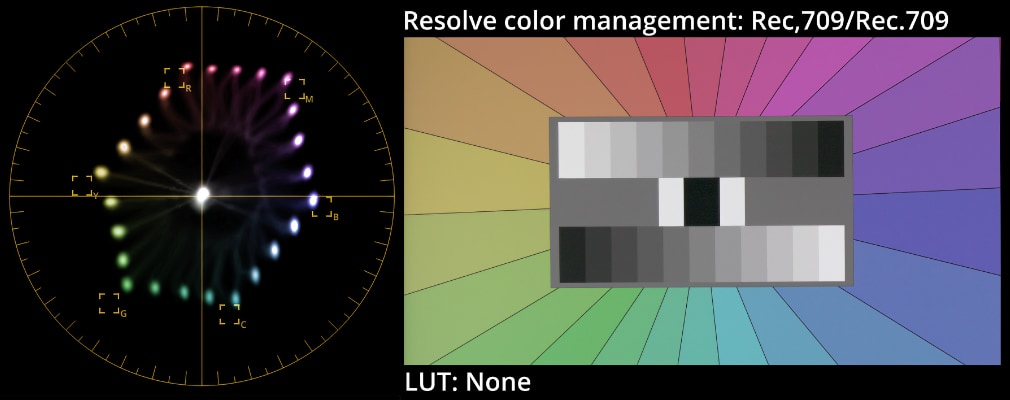
Resolve also allows decoding the RAW directly to a Rec.709 image...
...and an ACES workflow gives similarly saturated results...
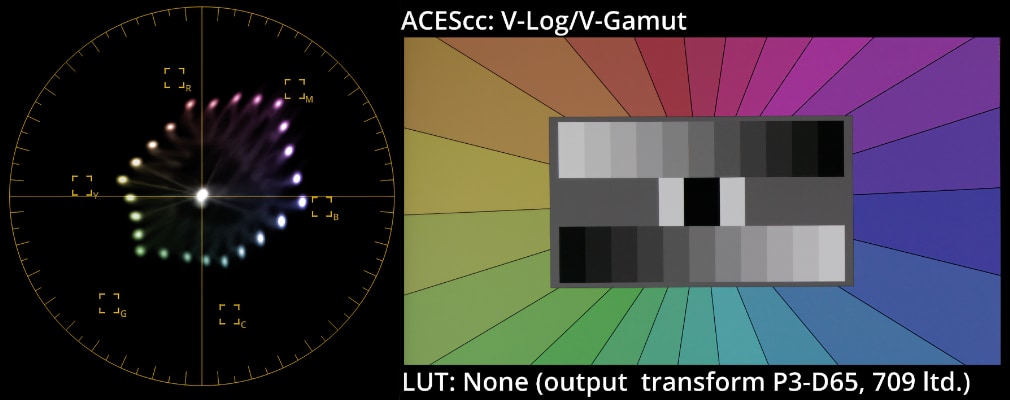
...but as these diverged from what I was able to get with the standard LUTs in FCP, I stuck with the RCM V/Log/V-Gamut to V-709 transform for the tests.
(In the screen grabs above, the vectorscope is at x2 for Resolve’s ’scope. FCP’s scope lacks the x2 setting, so its ’scope shots were taken using an adjustment layer doubling the color saturation.)
I didn't try to match colors beyond those basic settings. I did use the RAW exposure sliders (and basic color correction level controls when sliders were maxed out) to adjust levels in the exposure ramps and perform fine tweaks to equalize levels on the ’scopes, as there was some slop in the aperture of the taking lens. In the Sample reel, I adjusted the level of the panning shot by +.6 stop and boosted the saturation on the third shot to emphasize the sky, but those aside no image tweaks have been performed.
All clips were initially rendered out as ProRes 4444 to best preseve fine detail. Any further editing to assemble videos was done with the ProRes 4444 clips, and I rendered out and pixel-peeped everything from H.264 to ProRes 4444 to settle on ProRes 422 as being capable of conveying the essence of the tests without consuming too much storage and download bandwidth.
Of course Vimeo recompresses things for display, and the most obvious difference is the loss of fine color detail, so if you’re intent on seeing what the sources really look like, download the ProRes 422 originals.
PNG and EXR stills were exported from the ProRes 4444 files using Screen.
Cross-checking in Avid Media Composer
I ran a quick test in Avid Media Composer, which can open both BRAW and Prores RAW, to make sure that the differences I saw between the formats was due to the formats themselves and not due to different NLEs. Indeed, I found that the same subtle differences in edge crispness and color noise were replicated in MC, just as they were in Resolve and FCP respectively.
Avid’s BRAW decoding controls echo those found in Resolve:
But Avid didn't provide a similar panel for ProRes RAW; it simply presented a RAW clip as a linear image with the following Color Encoding transformations:
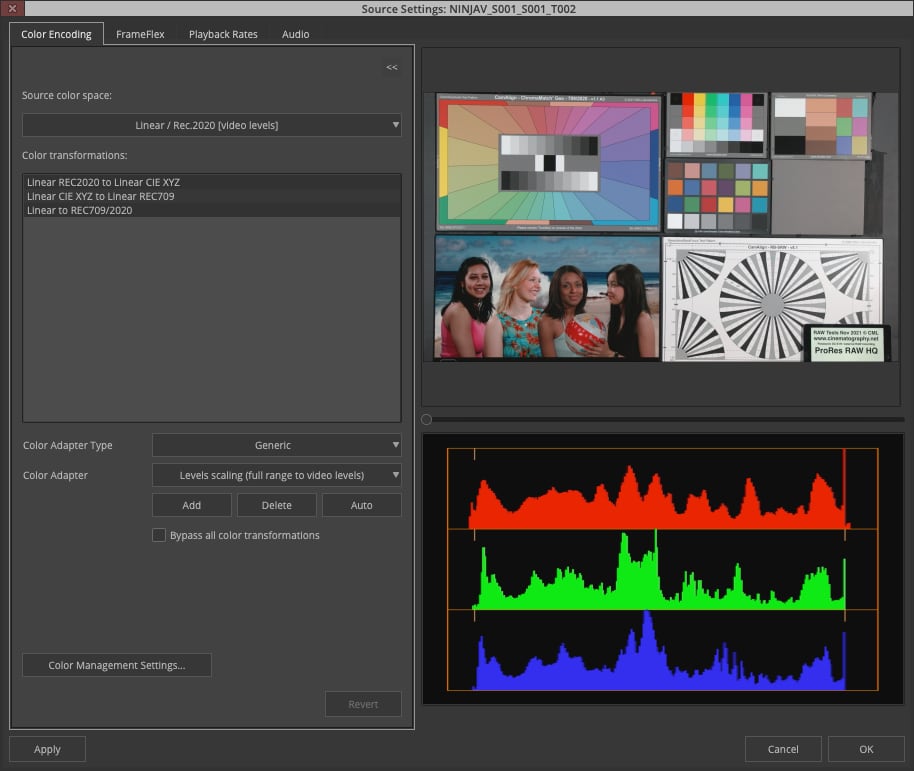
I found the closest match for BRAW by setting its Color Space to Linear and then using these Color Encoding settings:

These yielded images that were close in color and tone, but not identical (these two shots were captured without touching the camera’s controls, so their exposures should be the same).
External RAW vs. internal log
I also shot the charts with the S1H’s internal log recording. It’s interesting to compare white balance correction with RAW compared to encoded log:
RAW capture, correct white balance
RAW capture, wrong white balance corrected in post

Log capture, correct white balance
Log capture, wrong white balance corrected in post
RAW allows a more transparent correction simply by adjusting the RAW file’s color temperature; pushing the log image around the same way doesn't affect all colors equally.
As a side note, many of the cameras these raw recorders work with automatically correct for lens distortion with native, electronically coupled lenses. This correction isn’t present in the RAW data. The S1H is one of these cameras; here’s a comparison between the internal (corrected) image and the RAW (uncorrected) image from the native 24-105mm f/4 zoom:
That corrected image will invariably be slightly softer than the uncorrected image as it has to be resampled (it’s also possible that the internal file has some pre-emptive low-pass filtering applied to make it more compression-friendly):

End Credits
This test was made possible by the generous loans of raw recorders from Atomos and Blackmagic Design. Special thanks to Nicole Caetano and Lewis Brown at Atomos and Stephanie Hueter at Blackmagic for organizing the loans and answering my impertinent questions, and to Daniel Chung for introducing me to the Atomos folks.
—Adam Wilt, December 2021
![]()
Copyright © CML. All rights reserved.
- aces.png
- aces.png
- aces.png
- aces.png
- 24-7.jpg
- 24-7.jpg
- arri.png
- arri.png
- BandH.jpg
- camalot.png
- camalot.png
- dedo.png
- dsc.png
- dsc.png
- HotRodCameras.png
- HotRodCameras.png
- fujifilm.png
- kino.png
- Hawk.png
- JustCinemaGear.jpg
- Leitz_logo.png
- Leitz_logo.png
- Lowing.gif
- Module8Logo.png
- GodoxLogo.png
- Nanlux.png
- NPV_new_logo-(3)-(002).png
- NMBLogoForCML.png
- lindseyo.jpg
- Aputure.png
- TC Logo Centered K_2.png
- VMI.png
- zeiss-logo.png
- zeiss-logo.png
-(002).png)
- aces.png
- aces.png
- aces.png
- aces.png
- 24-7.jpg
- 24-7.jpg
- arri.png
- arri.png
- BandH.jpg
- camalot.png
- camalot.png
- dedo.png
- dsc.png
- dsc.png
- HotRodCameras.png
- HotRodCameras.png
- fujifilm.png
- JustCinemaGear.jpg
- Leitz_logo.png
- Leitz_logo.png
- GodoxLogo.png
- Nanlux.png
- NPV_new_logo-(3)-(002).png
- NMBLogoForCML.png
- FilmLightLogo.png
- theKeep.png
- NewLifeCineLogo.png
- PostWorks.png
- Aputure.png
- TCS.png
- TC Logo Centered K_2.png
- zeiss-logo.png
- zeiss-logo.png
- aces.png
- aces.png
- aces.png
- aces.png
- 24-7.jpg
- 24-7.jpg
- arri.png
- arri.png
- BandH.jpg
- camalot.png
- camalot.png
- dedo.png
- dsc.png
- dsc.png
- HotRodCameras.png
- HotRodCameras.png
- fujifilm.png
- kino.png
- Hawk.png
- JustCinemaGear.jpg
- Leitz_logo.png
- Leitz_logo.png
- Lowing.gif
- Module8Logo.png
- GodoxLogo.png
- Nanlux.png
- NPV_new_logo-(3)-(002).png
- NMBLogoForCML.png
- lindseyo.jpg
- Aputure.png
- TC Logo Centered K_2.png
- VMI.png
- zeiss-logo.png
- zeiss-logo.png
- aces.png
- aces.png
- aces.png
- aces.png
- 24-7.jpg
- 24-7.jpg
- arri.png
- arri.png
- BandH.jpg
- camalot.png
- camalot.png
- dedo.png
- dsc.png
- dsc.png
- HotRodCameras.png
- HotRodCameras.png
- fujifilm.png
- JustCinemaGear.jpg
- Leitz_logo.png
- Leitz_logo.png
- GodoxLogo.png
- Nanlux.png
- NPV_new_logo-(3)-(002).png
- NMBLogoForCML.png
- FilmLightLogo.png
- theKeep.png
- NewLifeCineLogo.png
- PostWorks.png
- Aputure.png
- TCS.png
- TC Logo Centered K_2.png
- zeiss-logo.png
- zeiss-logo.png