Basic Interview Lighting
This is a really simple interview lighting setup which I've based around a 60 * 60 softlight, the IKEA FLOALT is the lamp I had in mind :-)
If your interviewer is next to you then your key should be the other side of the interviewer. I know this is really basic but it's something I see done wrongly all the time. There is a basic rule, you light from "inside the shot". I've added a "bad" version of this at the bottom that illustrates what I mean.
I've deliberately rendered these images in a small room or office. The people are standing because I have trouble posing the models in the software! it doesn't have any effect on the lighting if they sit.
I always put the first black in to block ambient even if, as in this case, it looks fine as it is. This gives me control over any ambient variations or oddly coloured walls, they're white in this scenario.
I then add a flag to darken the background and force attention on to the interviewee and then add a reflector to fill the shadow side. In this case it's a small poly reflector but it could be a bigger silver one if you want more.
I reduced the ISO of the camera so that I could shoot with a wider aperture as I wanted the background softer. This is the software that I use to generate these images.
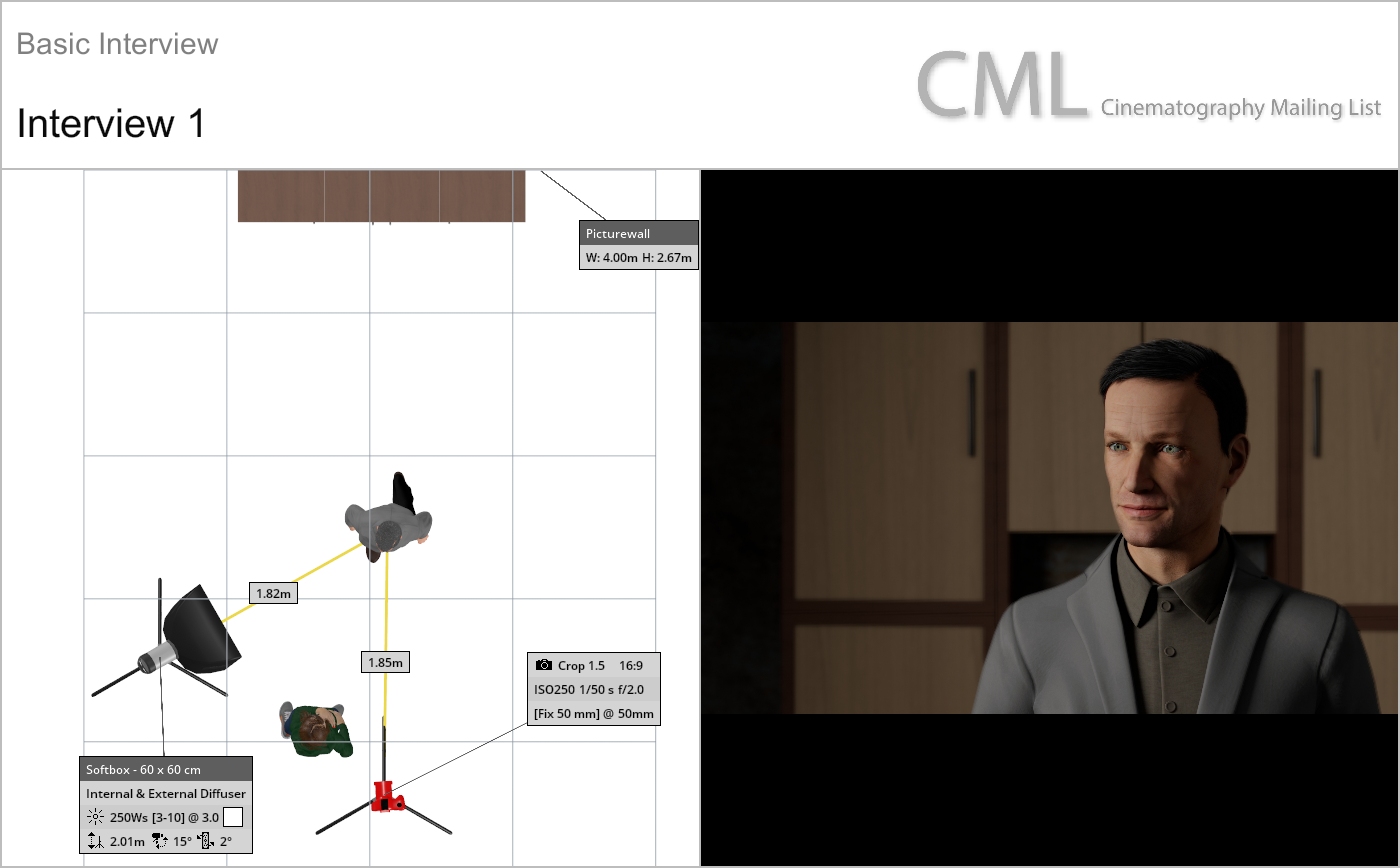
Basic key-light position, once again I measured the distance from fingertip to fingertip
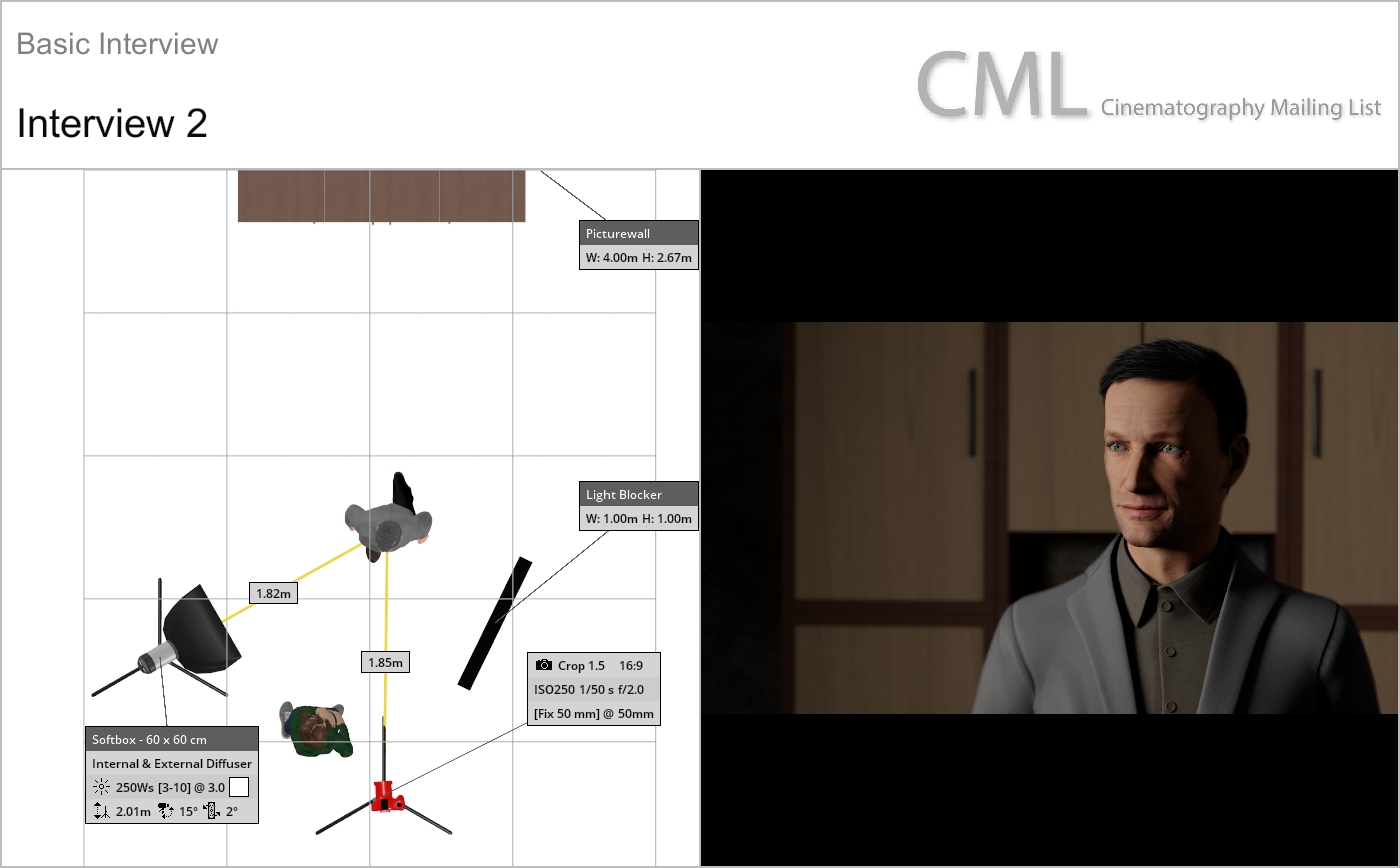
Flag on camera right to darken shadows and block ambient light
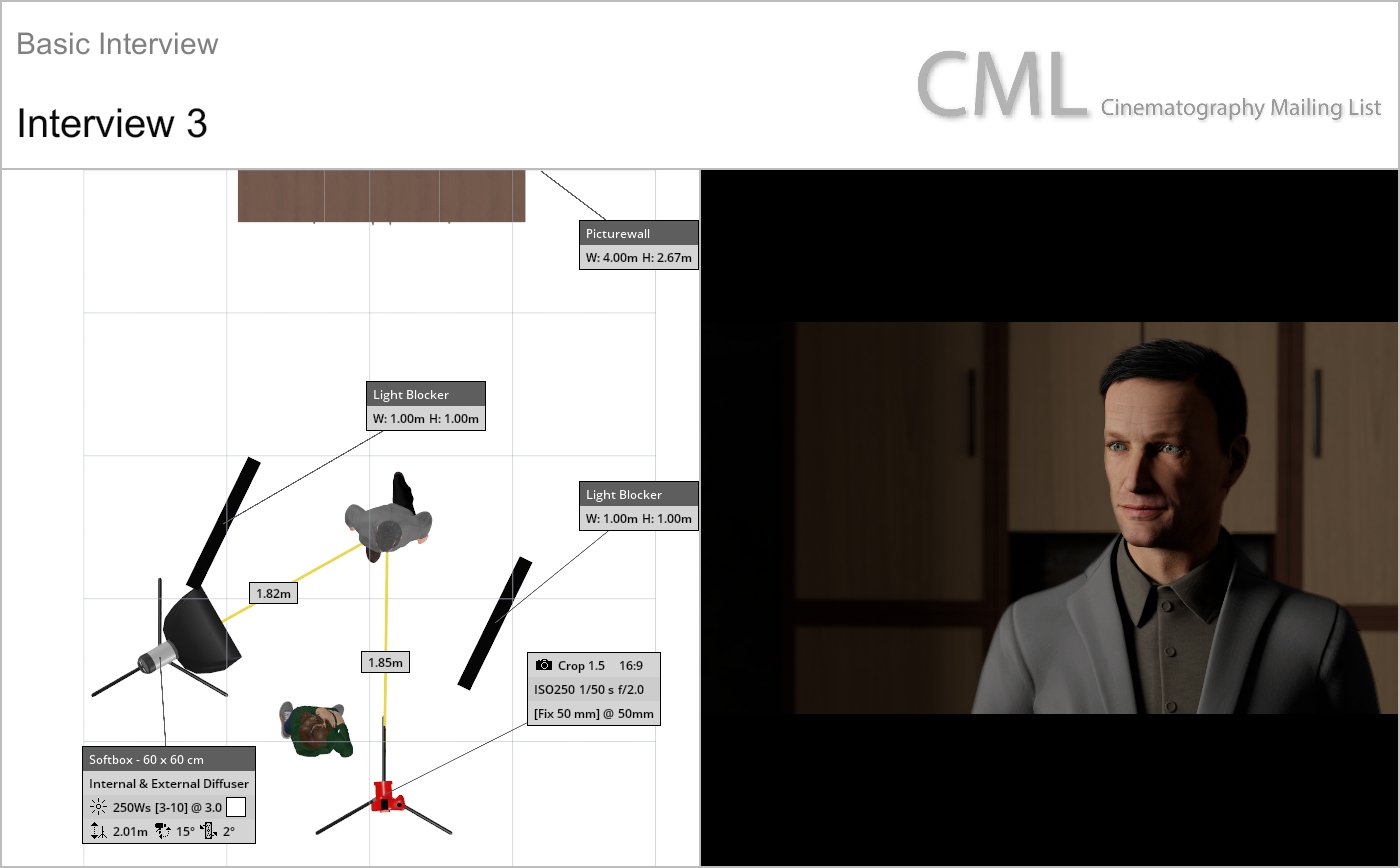
Flag to the left to block the key from the background, the closer it is to the key the softer it is, giving a gradual gradation.
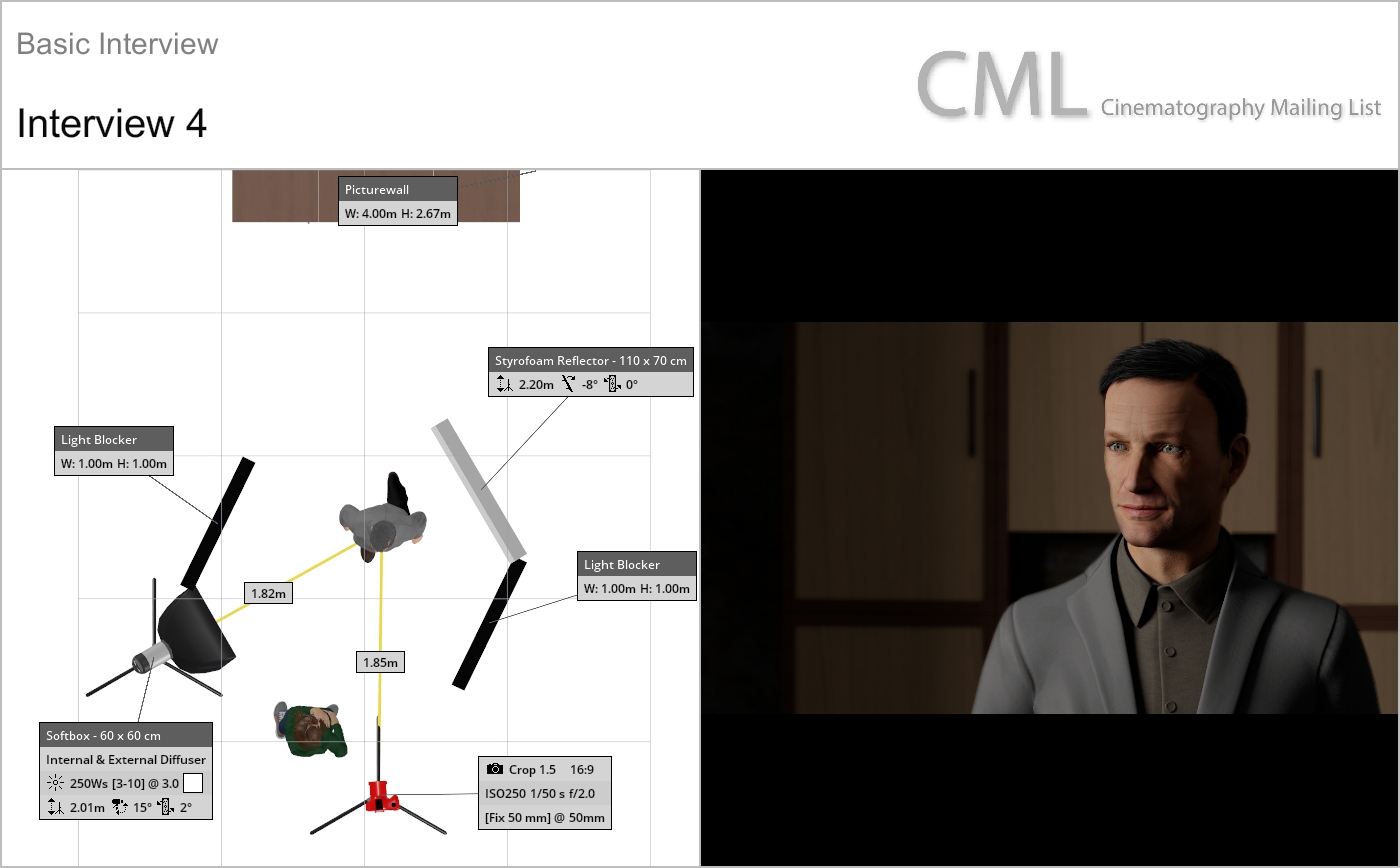
A reflector to the back right of shot to fill the shadows on the right of his face that I created in clip 2. This way I have control of how bright/dark that side is.
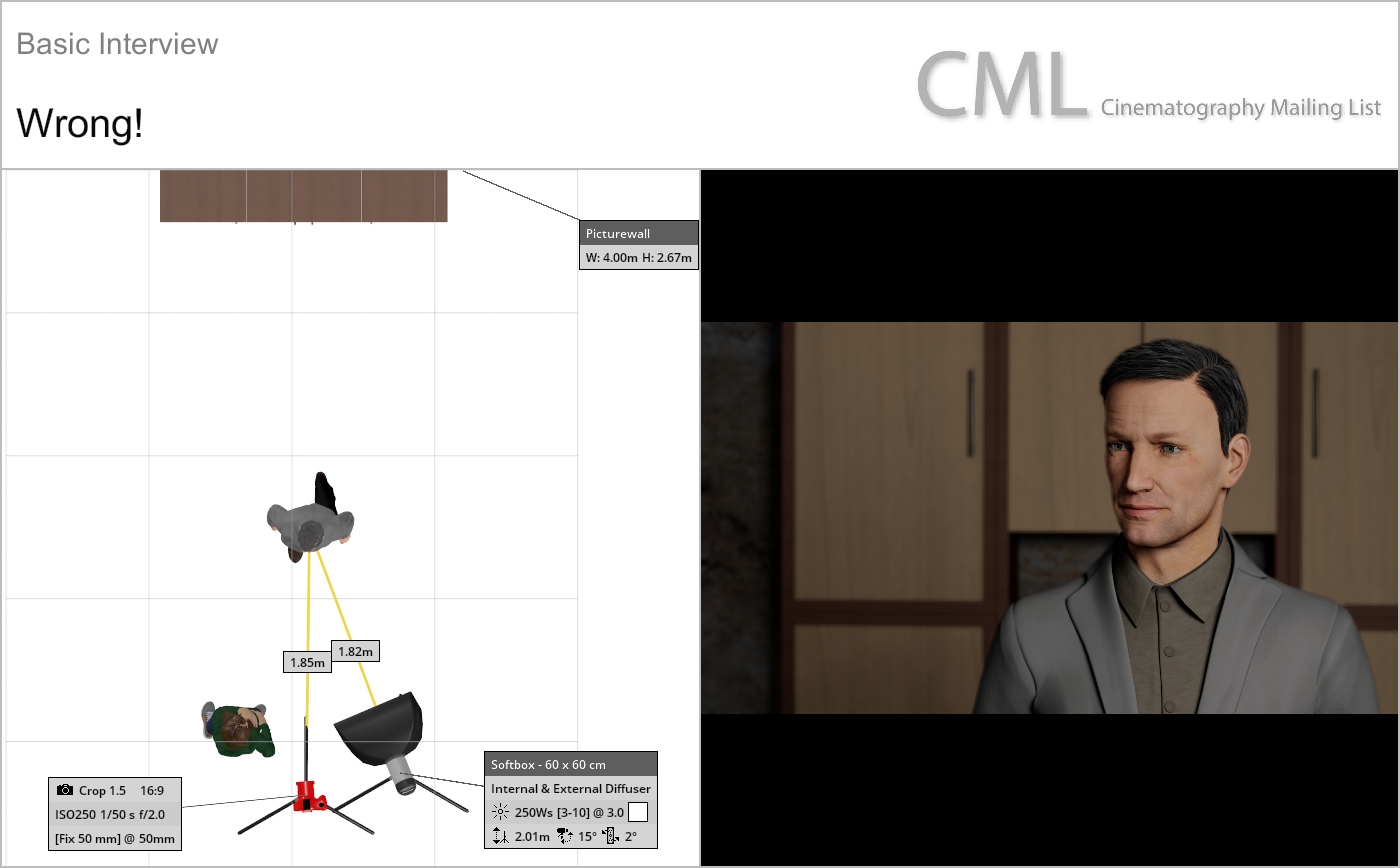
This is just bad and I see it all the time...
Copyright © CML. All rights reserved.
- aces.png
- aces.png
- aces.png
- aces.png
- 24-7.jpg
- 24-7.jpg
- arri.png
- arri.png
- BandH.jpg
- camalot.png
- camalot.png
- dedo.png
- dsc.png
- dsc.png
- kino.png
- Hawk.png
- JustCinemaGear.jpg
- Leitz_logo.png
- Leitz_logo.png
- Lowing.gif
- Module8Logo.png
- GodoxLogo.png
- Nanlux.png
- NPV_new_logo-(3)-(002).png
- NMBLogoForCML.png
- lindseyo.jpg
- Aputure.png
- TC Logo Centered K_2.png
- VMI.png
- zeiss-logo.png
- zeiss-logo.png
- aces.png
- aces.png
- aces.png
- aces.png
- 24-7.jpg
- 24-7.jpg
- arri.png
- arri.png
- BandH.jpg
- camalot.png
- camalot.png
- dedo.png
- dsc.png
- dsc.png
- FUJINON.jpg
- JustCinemaGear.jpg
- Leitz_logo.png
- Leitz_logo.png
- GodoxLogo.png
- Nanlux.png
- NPV_new_logo-(3)-(002).png
- NMBLogoForCML.png
- FilmLightLogo.png
- theKeep.png
- NewLifeCineLogo.png
- PostWorks.png
- Aputure.png
- TCS.png
- TC Logo Centered K_2.png
- zeiss-logo.png
- zeiss-logo.png
- aces.png
- aces.png
- aces.png
- aces.png
- 24-7.jpg
- 24-7.jpg
- arri.png
- arri.png
- BandH.jpg
- camalot.png
- camalot.png
- dedo.png
- dsc.png
- dsc.png
- kino.png
- Hawk.png
- JustCinemaGear.jpg
- Leitz_logo.png
- Leitz_logo.png
- Lowing.gif
- Module8Logo.png
- GodoxLogo.png
- Nanlux.png
- NPV_new_logo-(3)-(002).png
- NMBLogoForCML.png
- lindseyo.jpg
- Aputure.png
- TC Logo Centered K_2.png
- VMI.png
- zeiss-logo.png
- zeiss-logo.png
- aces.png
- aces.png
- aces.png
- aces.png
- 24-7.jpg
- 24-7.jpg
- arri.png
- arri.png
- BandH.jpg
- camalot.png
- camalot.png
- dedo.png
- dsc.png
- dsc.png
- FUJINON.jpg
- JustCinemaGear.jpg
- Leitz_logo.png
- Leitz_logo.png
- GodoxLogo.png
- Nanlux.png
- NPV_new_logo-(3)-(002).png
- NMBLogoForCML.png
- FilmLightLogo.png
- theKeep.png
- NewLifeCineLogo.png
- PostWorks.png
- Aputure.png
- TCS.png
- TC Logo Centered K_2.png
- zeiss-logo.png
- zeiss-logo.png


